Knowledge Management
How to use Material UI to build application
- By Geethika Naga Lakshmi Lolugu
- No Comments
- Home
- Blog
- Knowledge Management
- How to use Material UI to build application
06 Sep

How to use Material UI to build application
Introduction:
Material UI is a design language developed by Google in 2014 that features react components. There are lot of UI components available to fulfill the business needs. Also, the customizable components of the material UI can be easily modified as per our requirements. It is a library that allows us to import and use different components to create a user interface in our react applications. This saves a significant amount of time since the developers do not have to write everything from the scratch.

How does the Material UI is used to build application?
Material UI is the most powerful and efficient tool to build an application by adding designs and animations with technical and scientific innovation. It uses JavaScript frameworks and libraries like AngularJS and ReactJS to make the application more amazing and responsive. Also, enables the users to add design, animations, grid-system, shadows, and lightning effects, which allows for faster and easier stylized web development.
Why should we choose Material UI?
Material Design is a key approach to Android platform for both UI and UX. Its original purpose was for designing apps for both desktops and mobile platforms.
It’s created to bring user experience and provides optional CSS Baselines components. It has many default themes so; we can easily customize the themes and, we can customize the components.
To avoid making terrible user interfaces, material design shows UX designers a clear path regarding how to design animations, styles, layouts, components, and patterns. This is done so that anyone interacting with any of the Google products and services has a unified and pleasurable user experience.
Browser support:
Material UI supports the latest, stable releases of all major browsers and platforms. It also supports Internet Explorer 11.

Features of Material UI:
Material UI provides low-level utility functions called “style functions” for building powerful design systems.
- Access the theme values directly from the component props.
- Encourage UI consistency.
- Write responsive style effortlessly.
- Work with any theme object.
- Less than KB zipped.
- Fast enough to execute.
Prerequisites of Material UI:
Material UI provides low-level utility functions called “style functions” for building powerful design systems.
These are the other prerequisites required:
- A code editor like (VS Code).
- NodeJS should be installed.
Following are the steps:
Step 1: Installing the Material-UI dependencies
To install Material UI, run the below command in your working directory.
Install Material UI by using npm
npm install @material-ui/core
Install Material UI by using yarn
yarn add @material-ui/core
Step 2 - Application of Material-UI components:
To use Material-UI components, we first need to import them into our project. This is done, as shown below.
Detailed Example using react:
In this example we will import button.
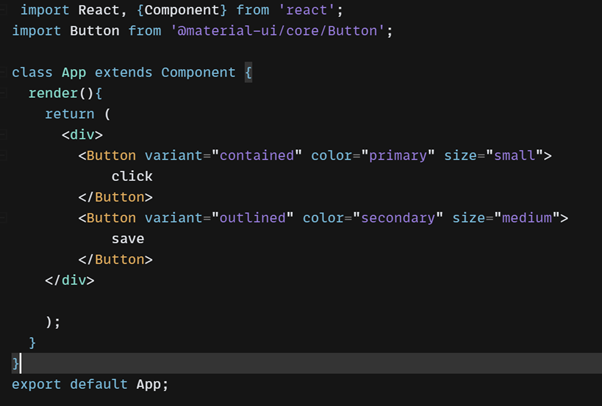
Output:
color=”primary” : We have some default color like primary and secondary color .
size=”small” : We can define the size of the button like small, medium, large.
Responsive meta tag:
Material UI is developed mobile-first, a strategy in which we can first write code for mobile devices. To ensure proper rendering and touch zooming for all devices, add the responsive viewport meta tag to your <head> element.
<meta name=”viewport” content=”minimum-scale=1, initial-scale=1, width=device-width”/>
Media queries:
We can add CSS media queries, if necessary.
This is a CSS media query hook for React. It listens for matches to a CSS media query. It allows the rendering of components based on whether the query matches or not.
You can customize the values of this breakpoint in the theme. A breakpoint is the range of predetermined screen sizes that have specific layout requirements. The functions you asked about (up, down, between) are helpers for creating media queries using the breakpoints defined in the theme.
CSS media queries are the idiomatic approach to make your UI responsive. The theme provides four style helpers to do so:
- Theme.breakpoints.up(key)
- Theme.breakpoints.down(key)
- Theme.breakpoints.only(key)
- Theme.breakpoints.between(start, end)
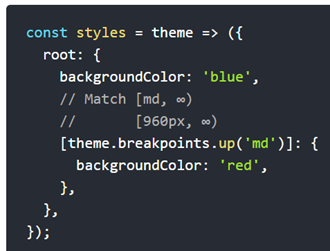
theme.breakpoints.up(key):
Which matches screen widths greater than and including the screen size given by the breakpoint key.
key (String | Number): A breakpoint key (xs, sm, etc.) or a screen width number in pixels.
Example:
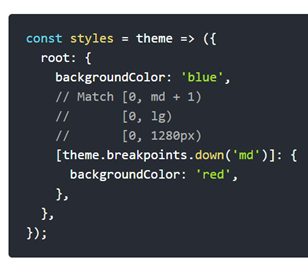
theme.breakpoints.down(key):
Which matches screen widths less than and including the screen size given by the breakpoint key.
key (String | Number): A breakpoint key (xs, sm, etc.) or a screen width number in pixels.
Example:
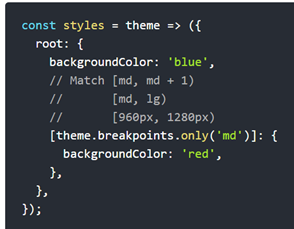
theme.breakpoints.only(key):
Which matches screen widths including the screen size given by the breakpoint key.
key (String): A breakpoint key (xs, sm, etc.).
Example:
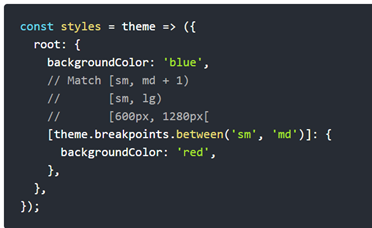
theme.breakpoints.between(start, end):
Which matches screen widths greater than the screen size given by the breakpoint key in the first argument and less than the screen size given by the breakpoint key in the second argument.
start (String): A breakpoint key (xs, sm, etc.) or a screen width number in pixels.
end (String): A breakpoint key (xs, sm, etc.) or a screen width number in pixels.
Example:
Responsive Breakpoints and Grids:
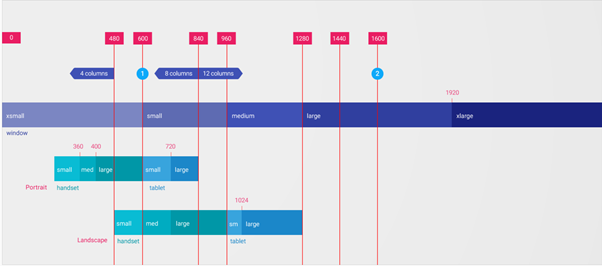
Responsive layouts in material design adapt to any possible screen size, the UI guidelines include flexible grid that ensures consistency across layouts, breakpoint details about how content reflows on different screens, and a description of how an app can scale from small to extra-large screens.
Default Breakpoints:
- xs, extra-small: 0px
- sm, small: 600px ---- Both breakpoints are for mobile devices/small screens.
- md, medium: 960px ---- This breakpoint is for iPad view/Medium screens.
- lg, large: 1280px
- xl, extra-large: 1920px ---- This breakpoint is for desktop view / Larger screens.

Preview design breakpoints with this interactive viewer across desktop, mobile and tablet:
Reference Links:
Meet Geethika Naga Lakshmi Lolugu, a Software Engineer at Acuvate. She has over 3+ years of industry experience in User interface & User experience design and development. This techie is very much focused to secure a challenging role in Web development/ Front end developer and contributing her efforts to reach the company goals. She has also worked on various projects including Unilever, bcpc, bcw(brand collaboration workspace) and now, she is part of Mesh 3.0.


Geethika Naga Lakshmi Lolugu